Preferred Names
- Edward
- Jul 9, 2023
- 4 min read
Recently I’ve been working on a solution which enables our students to sign up and be paid for checking our teaching spaces each morning – over 450 of them - making sure that we’re ready for the day ahead. We want them to feel part of the team and respect that they may have a preferred name they would like us to use in communications, rather than their formal registered name.
My workplace ‘raison d'être’ is our student body and it’s essential for me to reflect their significance in my technical work.
In this post we’ll explore a way to do this in a straightforward yet automated way. You’ll need access to Microsoft Forms and Power Automate. We’ll be using the Office 365 User Profile connector in Power Automate.
Creating the Form

1. Create a new Form. Head to the Settings area via the “…” in the top right.
2. Choose the option for ‘Only people in my organisation can respond’ and also to ‘Record name’.
This enables our form to automatically capture the details of the form respondent, as they have to log in with their organisation credentials to access the Form. This means we don’t need to ask them for their first name, surname or organisation email address.
3. Create a new Text question on the form. A short answer question is ideal.
Make it optional by toggling off the ‘Required’ toggle – as some respondents won’t have a preferred name that they wish to provide.
I suggest adding a Subtitle, or ‘hint text’, just to reassure the respondent the question is optional and if they decide to respond, it won’t affect their official student record.
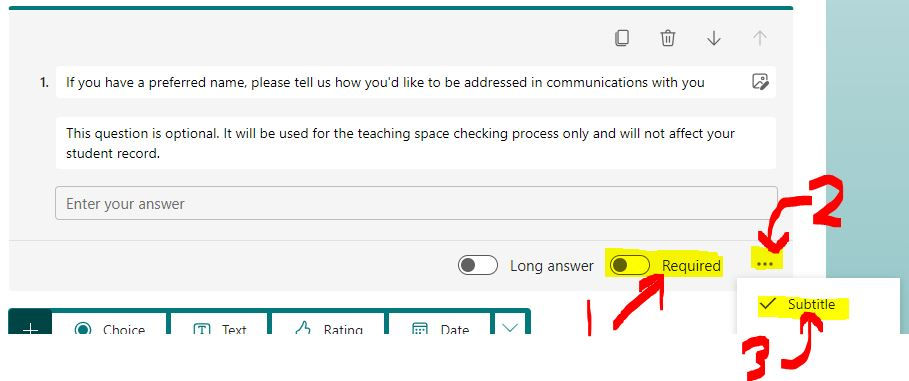
Here’s the text I used:
If you have a preferred name, please tell us how you'd like to be addressed in communications with you
This question is optional. It will be used for the teaching space checking process only and will not affect your student record.
Our form is all set so let’s head over to Power Automate.
Setting up the Flow in Power Automate
4. Create a new Automated Cloud Flow. Give it a meaningful name and select the tigger as “When a new response is submitted” for Microsoft Forms.
Within the trigger, select the form you’ve created in the ‘Form ID’ dropdown.
5. As always, add the first action as ‘Get response details’ and make sure you select the same Form ID as in the trigger. In Response ID, select the Dynamic Content ‘Response ID’ that relates to your trigger.
6. We can now insert the ‘Get user Profile (v2)’ action from the Office 365 Users connector. For the user (UPN), we can use the ‘Responder’s E Mail Address’ from the Form. This was captured automatically from the Form submission.

7. Next, let’s choose to insert a new step and pick ‘Initialize a Variable’. Give it the following properties:
Name: varPreferredName
Type: String
Value: Use the dynamic content picker to insert the question from your form, “If you have a preferred name….”
We have chosen ‘String’ here because if a respondent has chosen to provide us with a preferred name, it will be a combination of letters, and not uniquely numbers for example.
Remember, it’s best practice in Power Automate to give our actions a unique and descriptive (yet short) name – and also add a note.
For the name, avoid adding any spaces and keep it short – it makes it much easier to reference it later.
Notes are really helpful when you look back at a Flow and want to quickly see what is due to happen in the action. Check out the note I added on the Condition in the next step to explain what’s happening.
You can rename the action and add a note by clicking the ‘…’ at the top right of the action, like this:

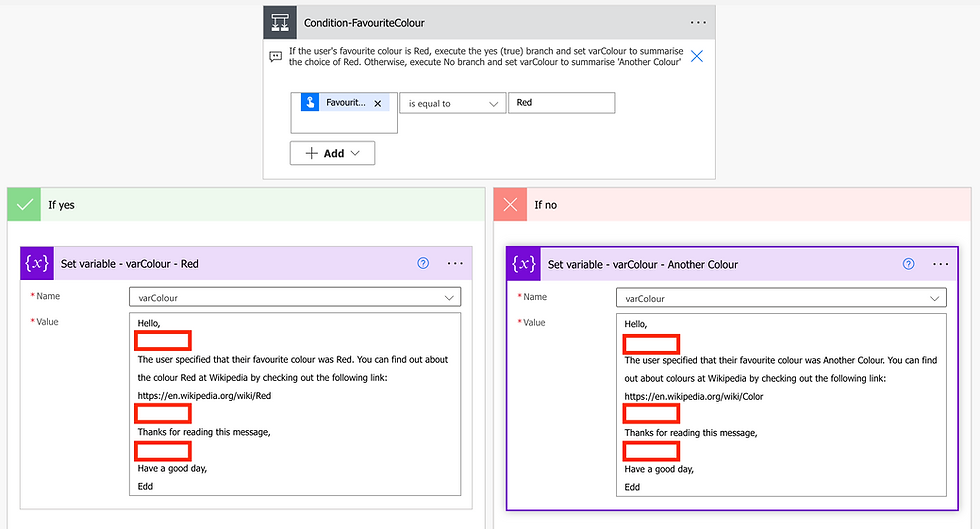
8. We’re now going to add a Condition which allows us to test if something is true or false; in other words “Is this statement true?” and the outcomes are “Yes” or “No”.
Create a new condition and on the left hand side, add varPreferredName. Make sure “is equal to” is set in the middle. On the right hand side, leave it blank.
What we’re testing here is whether the form respondent provided any data in the Preferred Name question on the form: “Is varPreferredName equal to [nothing]?”.
If a preferred name was not provided and varPreferredName is empty, the ‘yes’ branch executes, so we want to set their preferred name as their standard Given Name (formal name) from their Office 365 profile.
If varPreferredName is not empty and the ‘no’ branch executes, we don’t need to do anything – since we already set varPreferredName as the form respondent's reply to the 'preferred name question' in the previous step.
Here’s what your condition should look like – and don’t forget to rename your actions and add notes too! Tip: click the image to expand it for easier viewing.

And that’s it! We now have the respondent’s preferred name, whether it’s one they provided, or their Given Name from their Office 365 profile, safely stored in varPreferredName.
We can use the varPreferredName variable anywhere in the Flow, like recording it in to a SharePoint list or sending an email notification, in the confidence it will always contain the relevant salutation name.
Don’t forget, as we used the ‘Get user profile (v2)’ connector for Office 365, we still have their Given Name accessible to us in the Flow – so you might want to have a column in your SharePoint list which always contains the respondent’s Given Name too – so we have their Preferred Name and Given Name on their record.
I hope you found this helpful! In a future article I am going to write about testing if a variable is truly ‘empty’ as the method for this can differ; stay tuned. If you have any comments or questions please drop a note in the Comments section.


Comments